In this article, we’ll learn about Woocommerce Webhooks. In the dynamic world of e-commerce, keeping up with customer demands and automating processes is vital for success.
Table of Contents
Thankfully, WooCommerce, the leading e-commerce platform built on WordPress, offers a powerful feature called webhooks that can revolutionize your online store.
We’ll explore the incredible benefits of WooCommerce webhooks and how they can supercharge your e-commerce workflow user-friendly and efficient.
Understanding WooCommerce Webhooks:
A Webhook is an event notification sent to a URL of your choice. Users can configure them to trigger events on one site to invoke behavior on another.
Webhooks are useful for integrating with third-party services and other external API that support them. WooCommerce webhooks are a powerful tool that allows you to integrate WooCommerce with other applications.
When an event occurs in WooCommerce, such as an order being placed or a product being updated, a webhook can be triggered to send data to another application. This data can then be used to perform actions, such as sending an email notification or updating a CRM system.
How do WooCommerce webhooks work?
WooCommerce webhooks are based on the HTTP protocol. When an event occurs in WooCommerce, such as an order being placed, WooCommerce will send an HTTP request to the URL that is configured for the webhook. The request will include data about the event, such as the event type, the data associated with the event, and the timestamp of the event.
The application that receives the HTTP request can then take any action that it wants. For example, it could update a database, send an email, or trigger another webhook.
How to use WooCommerce webhooks
To use WooCommerce webhooks, you must first find an app that supports them. Once you’ve found an app, you need to create a webhook in WooCommerce. This usually involves providing WooCommerce with some information, such as the URL of the app that will receive the webhook requests.
Once you’ve created a webhook in WooCommerce, you need to configure the app that will receive the webhook requests. This usually involves providing the app with some information, such as the URL of the webhook and the type of data that will be sent in the webhook requests.
Once you’ve configured both WooCommerce and the app, you’re ready to start using webhooks. When an event occurs in WooCommerce, it will send an HTTP request to the app. The app will then receive the request and can take any action that it wants.
Create Woocommerce Webhooks:
To create a new webhook, follow the below steps:
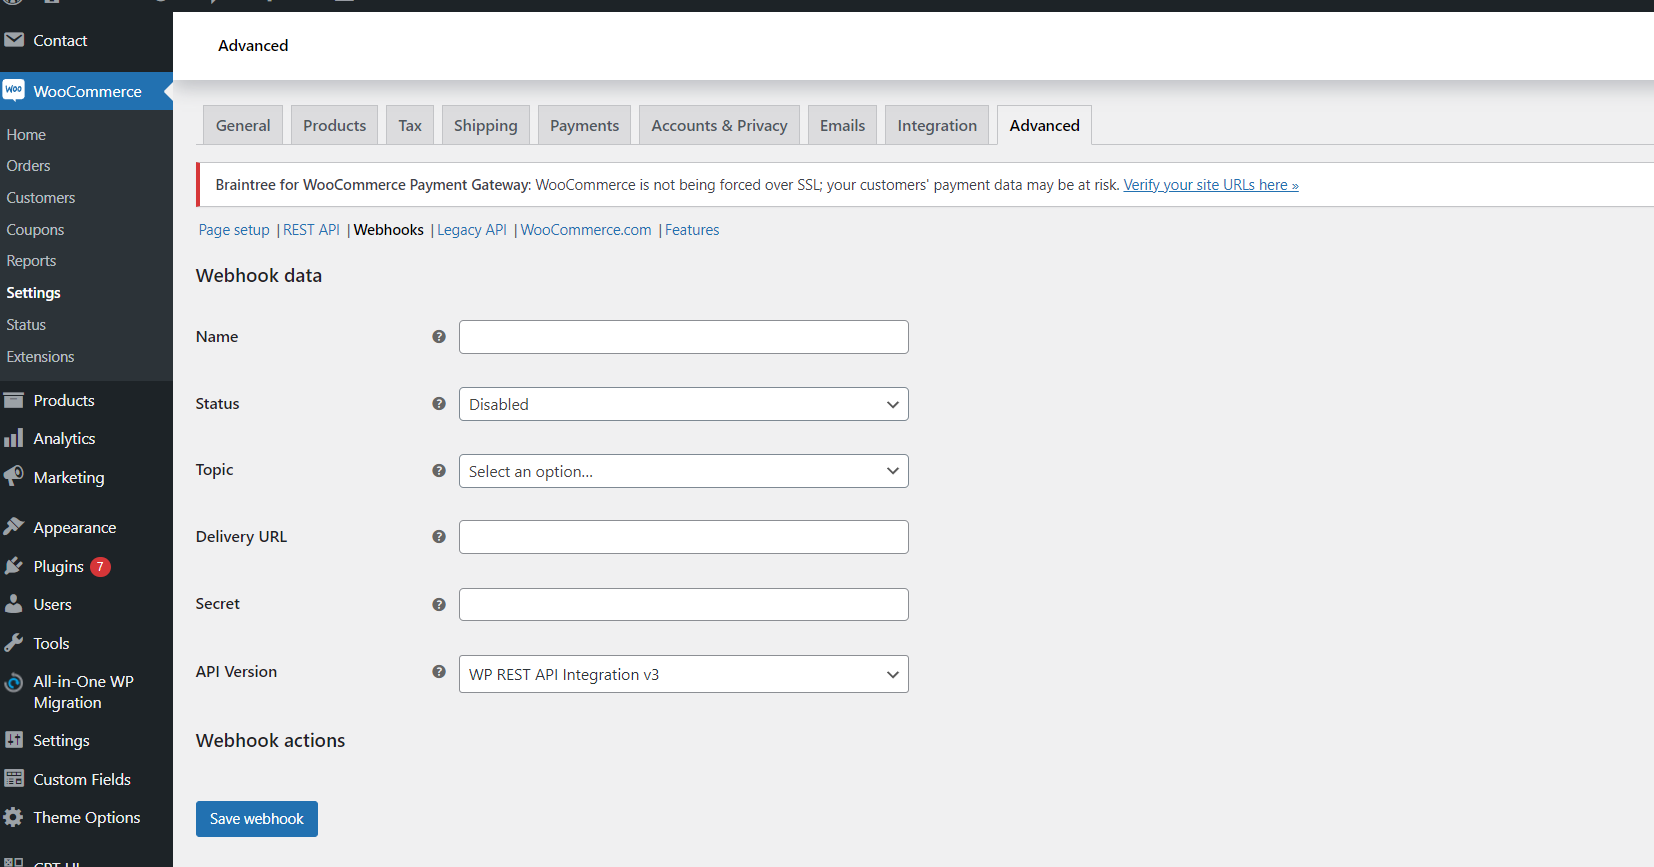
Step 1). Go to: WooCommerce > Settings > Advanced > Webhooks.
Note: Webhooks were formerly found under WooCommerce > Settings > API prior to WooCommerce 3.4.

Step 2). Select Create a new webhook (first incident) or Add webhook. The Webhook Data box appears. See the above screenshot.
Step 3). Enter.
- Name: The name is auto-generated as “Webhook created on [date and time of creation]” as a standard to facilitate creation. Change the name to something else.
- Status: Set to Active (delivers payload), Paused (does not deliver), or Disabled (does not deliver due to delivery failures).
- Topic: Indicate when the webhook should be triggered – Order Created, Product Deleted, or Customer Updated. There are also Action and Custom options.
- Action Event: This option is available when the Topic is a WooCommerce Action, such as
woocommerce_add_to_cartfor when customers add products to the shopping cart. - Custom Topic: This option is for advanced users only. It’s possible to introduce new, customized topics with the help of
woocommerce_webhook_topic_hooksfilter.
- Action Event: This option is available when the Topic is a WooCommerce Action, such as
- Delivery URL: URL where the webhook payload is delivered.
- Secret: The Secret Key generates a hash of the delivered webhook and is provided in the request headers. This defaults to the current API user’s consumer secret, if nothing is entered.
Step 4). Save Webhook.
Webhooks are disabled after 5 retries by default if the delivery URL returns an unsuccessful status such as 404 or 5xx. Successful responses are 2xx, 301 or 302.
How Do I Test a Webhook in WooCommerce?
To test a webhook in WooCommerce, you first need to create a WooCommerce webhook and then trigger it using the event you set while creating it.
After that, you can navigate to WooCommerce » Status from your WordPress admin dashboard and click the Logs tab, you’ll see that the webhook has been fired(If configured according to the process mentioned above).
Following are some prominent request collectors and testing tools.
- Action Scheduler
- RequestBin
- WooCommerce Logs
Benefits:
There are many benefits to using WooCommerce webhooks, including:
- Event-Driven Automation: Webhooks empower you to automate processes and perform actions based on events, such as order creation, payment completion, or customer registration. This functionality eliminates the need for manual intervention and ensures that crucial tasks are executed seamlessly.
- Data Synchronization: Webhooks enable the synchronization of data between WooCommerce and external systems, such as inventory management, CRM, or email marketing tools. This integration ensures that all your platforms stay updated in real-time, minimizing errors and improving efficiency.
- Customizable Triggers: WooCommerce offers a wide range of triggers to initiate webhooks. You can set up webhooks for events like order creation, order status changes, customer updates, and more. This flexibility allows you to create tailor-made workflows that suit your business needs.
- Secure Communication: Webhooks utilize secure communication protocols, ensuring that data is transmitted safely between your WooCommerce store and external services. This enhances data integrity and safeguards sensitive information.
- Real-time data: WooCommerce webhooks allow you to get real-time data from WooCommerce. This means that you can react to events as soon as they happen, rather than having to poll for data periodically.
- Automated workflows: WooCommerce webhooks can build automated workflows between WooCommerce and other applications. This can save you time and effort, and it can also help you to improve your overall productivity.
- Increased flexibility: WooCommerce webhooks give you a lot of flexibility in using them. You can use them to connect WooCommerce with other applications, build automated workflows, and even create custom integrations.
Conclusion
WooCommerce webhooks are a friendly and powerful tool that can enhance your e-commerce operations and improve customer satisfaction.
By embracing real-time data transfer and event-driven actions, you’ll streamline processes, automate tasks, and integrate seamlessly with external systems.
Elevate your e-commerce experience with WooCommerce webhooks and unlock new levels of efficiency and growth for your online store.
WooCommerce webhooks are a powerful tool that can be used to integrate WooCommerce with other applications. If you’re looking for a way to get real-time data from WooCommerce, build automated workflows, or increase your flexibility, then WooCommerce webhooks are a great option.
Here are some examples of how you can use WooCommerce webhooks:
- Send an email notification when an order is placed.
- Update a CRM system when a new customer signs up.
- Send a notification to a social media platform when a new product is launched.
- Trigger a custom integration when a specific event occurs.
The possibilities are endless!
References:
I hope this article helps!


My brother recommended I might like this web site. He was entirely right. This post truly made my day. You cann’t imagine simply how much time I had spent for this info! Thanks!
thnk you, are there examples for making webhook? i could not solve signature error