The MERN stack APP — MongoDB, Express.js, React, and Node.js — continues to be one of the most powerful combinations for building full-stack JavaScript applications in 2025.
Table of Contents
This modern stack allows developers to build scalable, maintainable, and dynamic web applications with a consistent language: JavaScript. In this guide, you’ll learn how to set up a MERN stack app from scratch using the latest tools and coding practices that align with 2025 standards.
Whether you’re a beginner learning to create your first full-stack app or an intermediate developer polishing your skills, this article will guide you through the process step-by-step with clean code examples, definitions of key terms, and explanations to help you understand what each section does.
What is MERN Stack?
The MERN stack APP is a JavaScript-based full-stack development framework made up of four powerful technologies:
-
MongoDB: A document-oriented NoSQL database used to store data in flexible, JSON-like documents.
-
Express.js: A lightweight Node.js web framework for building fast and simple APIs.
-
React: A powerful frontend JavaScript library maintained by Meta (Facebook) for building interactive user interfaces.
-
Node.js: A runtime that allows JavaScript to run on the server side.
These technologies work together to enable you to build everything from RESTful APIs to real-time applications — all using JavaScript.
MERN Stack APP Project Folder Structure
Organizing your files cleanly improves maintainability and team collaboration. A good structure for a MERN stack app looks like this:
mern-app/
├── backend/
│ ├── controllers/
│ ├── models/
│ ├── routes/
│ ├── config/
│ └── server.js
├── frontend/
│ └── src/
└── .env
Each directory serves a purpose: controllers/ holds business logic, models/ defines MongoDB schemas, and routes/ contains route definitions. Keeping concerns separated ensures a modular architecture.
Step 1: MERN Stack APP Backend Setup (Express + MongoDB)
We start by setting up the MERN stack app backend using Node.js and Express.js. This server will connect to a MongoDB database, expose a set of RESTful APIs, and serve as the foundation for our frontend app to interact with.
1) Installation: Open a terminal and run the following command to set up the necessary Node JS libraries, such as Mongoose for MongoDB and Express for the Express JS framework.
mkdir mern-app && cd mern-app
npx mkdirp backend/{routes,models,controllers,config}
cd backend
npm init -y
npm install express mongoose dotenv cors
2) Create a server.js file inside the backend directory and add the following code:
const express = require('express');
const dotenv = require('dotenv');
const cors = require('cors');
const taskRoutes = require('./routes/taskRoutes');
const connectDb = require("./config/db");
dotenv.config();
const app = express();

const PORT = process.env.PORT || 5000;
// Middleware
app.use(cors());
app.use(express.json());

// Routes
app.use('/api/tasks', taskRoutes);

// MongoDB Connection
connectDb().then(() => {
  app.listen(PORT, () => {
    console.log(`server is running at port: ${PORT}`);
  });
});
3) Create a db.js file inside the config directory under backend directory for MongoDB Connection
const mongoose = require("mongoose");
const dotenv = require('dotenv');
dotenv.config();
// mongoose.connect(URI);
const URI = process.env.MONGO_URI;
const connectDb = async () => {
  try {
    console.log(URI)
    await mongoose.connect(URI);
    console.log("connection successful to DB");
  } catch (error) {
    console.error("database connection failed");
    process.exit(0);
  }
};
module.exports = connectDb;
4) Environment Variables: Create a .env file at the root and write the following code. Also, replace <db_password> with the password for the umangapps48 database user. you can learn more about this on https://www.mongodb.com/docs/drivers/node/current/fundamentals/connection/connect/#std-label-node-connect-to-mongodb article.
PORT=5000
MONGO_URI=mongodb+srv://umangapps48:<db_password>@cluster0.nwtloap.mongodb.net/?retryWrites=true&w=majority&appName=Cluster0
Backend Summary
In this step, we’ve installed the necessary dependencies (express, mongoose, cors, and dotenv) to build our backend. We configured our Express server to handle JSON and CORS, and set up a database connection to MongoDB using Mongoose. This setup forms the core of the backend server that can interact with a database and serve RESTful APIs.
Step 2: Create the MongoDB Model
Models in Mongoose define how data is structured in MongoDB. In this example, we’ll create a simple task model with two fields: title and completed.
1). Create Task model: Create backend/models/Task.js file and write the following code in Task.js file:
const mongoose = require('mongoose');
const taskSchema = new mongoose.Schema({
  title: { type: String, required: true },
  completed: { type: Boolean, default: false },
}, { timestamps: true });
module.exports = mongoose.model('Task', taskSchema);
Model Summary
This schema defines a MongoDB document for a task. title is a required string, and completed is a boolean, defaulting to false. The timestamps option automatically adds createdAt and updatedAt fields to each document — useful for tracking changes.
Step 3: Define Routes & Controllers
We’ll now create controller functions to handle CRUD operations and set up corresponding Express routes.
1) Controller logic: Create a taskController.js file in the backend/controllers/ directory
const Task = require('../models/Task');

// GET all tasks
const getTasks = async (req, res) => {
  const tasks = await Task.find();
  res.status(200).json(tasks);
};

// CREATE new task
const createTask = async (req, res) => {
  const task = await Task.create(req.body);
  res.status(201).json(task);
};

// UPDATE task by ID
const updateTask = async (req, res) => {
  const task = await Task.findByIdAndUpdate(req.params.id, req.body, { new: true });
  res.status(200).json(task);
};

// DELETE task
const deleteTask = async (req, res) => {
  await Task.findByIdAndDelete(req.params.id);
  res.status(204).end();
};

module.exports = {
  getTasks,
  createTask,
  updateTask,
  deleteTask
};
2). Define Route: Create a taskRoutes.js file in the backend/routes/ directory
const express = require('express');
const {
  getTasks,
  createTask,
  updateTask,
  deleteTask
} = require('../controllers/taskController');

const router = express.Router();
router.get('/', getTasks);
router.post('/', createTask);
router.put('/:id', updateTask);
router.delete('/:id', deleteTask);

module.exports = router;
Routes Summary
This part of the app exposes four key endpoints: GET (fetch all tasks), POST (create a new task), PUT (update a task by ID), and DELETE (Remove a task). The controllers abstract logic from routes, following the MVC pattern, making the app easier to maintain.
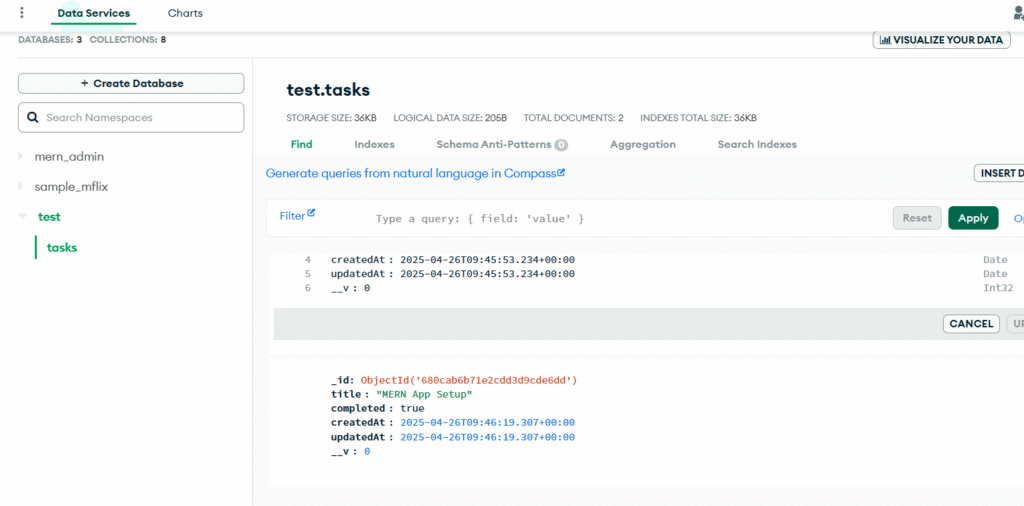
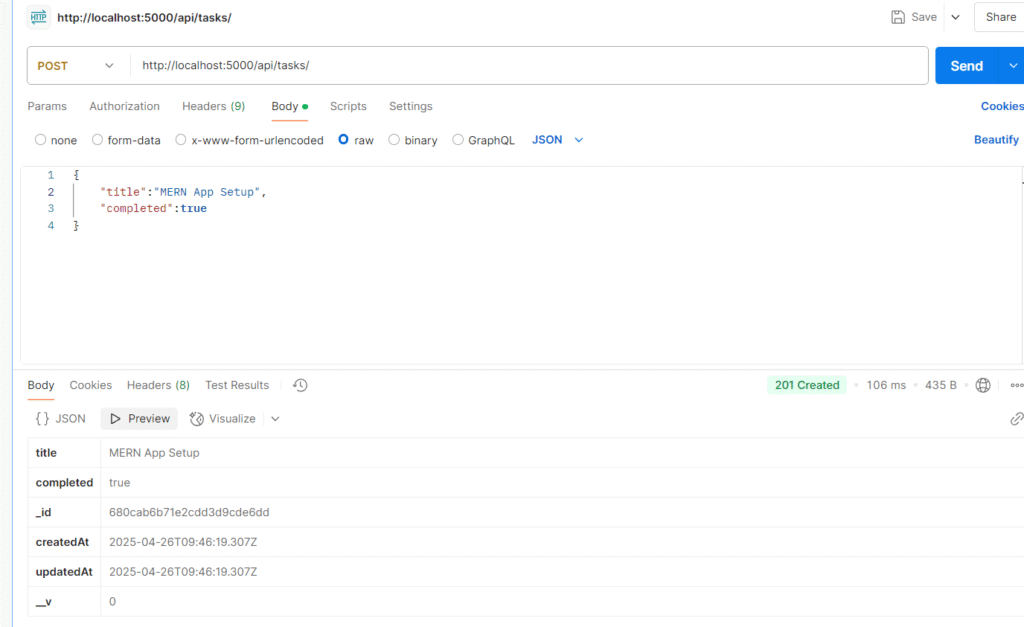
Once, backend of the MERN stack app is created with the above steps, you can run the “npm start” command in your terminal and use the Postman app you perform CRUD operations. For example, run “http://localhost:5000/api/tasks/” HTTP GET request to display all tasks data from the MongoDB database. Similarly, you can use other requests like the following to do other CRUD operations:
| Term | Meaning |
|---|---|
| GET /api/tasks | Fetch all tasks |
| POST | Create a new task |
| PUT | Update existing task by ID |
| DELETE | Remove task by ID |
| req.params.id | Gets ID from URL like /tasks/:id |
See screenshot below from Postman and MongoDB for the output


Step 4: MERN Stack APP Frontend with React
We’ll now build the frontend using Create React App. The UI will fetch and display tasks using Axios and React Hooks.
npm install axios
npm create vite@latest frontend
It will ask:
-
Project name →
frontend -
Framework →
React -
Variant →
JavaScript(orTypeScriptif you prefer)
Then:
cd frontend
npm install
npm run dev
Done! Your modern React app is running at http://localhost:5173/
2). Edit src/App.jsx file
import React, { useEffect, useState } from 'react';
import axios from 'axios';

function App() {
  const [tasks, setTasks] = useState([]);
  const [newTask, setNewTask] = useState('');
  const fetchTasks = async () => {
    const res = await axios.get('http://localhost:5000/api/tasks');
    setTasks(res.data);
  };

  const addTask = async () => {
    if (!newTask.trim()) return;
    await axios.post('http://localhost:5000/api/tasks', { title: newTask });
    setNewTask('');
    fetchTasks();
  };

  const deleteTask = async (id) => {
    await axios.delete(`http://localhost:5000/api/tasks/${id}`);
    fetchTasks();
  };

  useEffect(() => {
    fetchTasks();
  }, []);

  return (
    <div className="container">
      <h1> Task Manager</h1>
      <div>
        <input
          type="text"
          placeholder="New Task"
          value={newTask}
          onChange={(e) => setNewTask(e.target.value)}
        />
        <button onClick={addTask}>Add Task</button>
      </div>
      <ul>
        {tasks.map(task => (
          <li key={task._id}>
            {task.title}
            <button onClick={() => deleteTask(task._id)}>❌</button>
          </li>
        ))}
      </ul>
    </div>
  );
}
export default App;
Summary:
-
Using
axiosfor API calls. -
useStatemanages tasks and new task input. -
useEffectloads tasks on page load. -
Clean separation of functions (fetch, add, delete).
3). Edit src/index.css file
body {
font-family: sans-serif;
background-color: #f9f9f9;
padding: 2rem;
}
.container {
max-width: 600px;
margin: 0 auto;
}
input {
padding: 0.5rem;
margin-right: 0.5rem;
}
button {
padding: 0.5rem 1rem;
margin-left: 0.5rem;
}
ul {
list-style-type: none;
padding: 0;
}
li {
margin-top: 1rem;
background: #fff;
padding: 1rem;
border-radius: 5px;
display: flex;
justify-content: space-between;
}
Summary:
-
Simple responsive styling.
-
Clean layout for better user experience.
Frontend Summary
This frontend app uses Axios to fetch tasks from the backend API and displays them. We used useEffect() to load tasks when the component mounts, and useState() to store the data. The UI updates in real time and clearly displays the task list with simple indicators.
Step 5: Running the MERN stack App
At this point, your MERN stack app should be fully functional. The backend listens for API requests and connects to MongoDB, while the frontend fetches and renders the data beautifully. This is a complete MERN stack app built using modern practices.
Now, you need to run both projects:
In two terminals:
cd backend
npm start
and
cd frontend
npm run dev
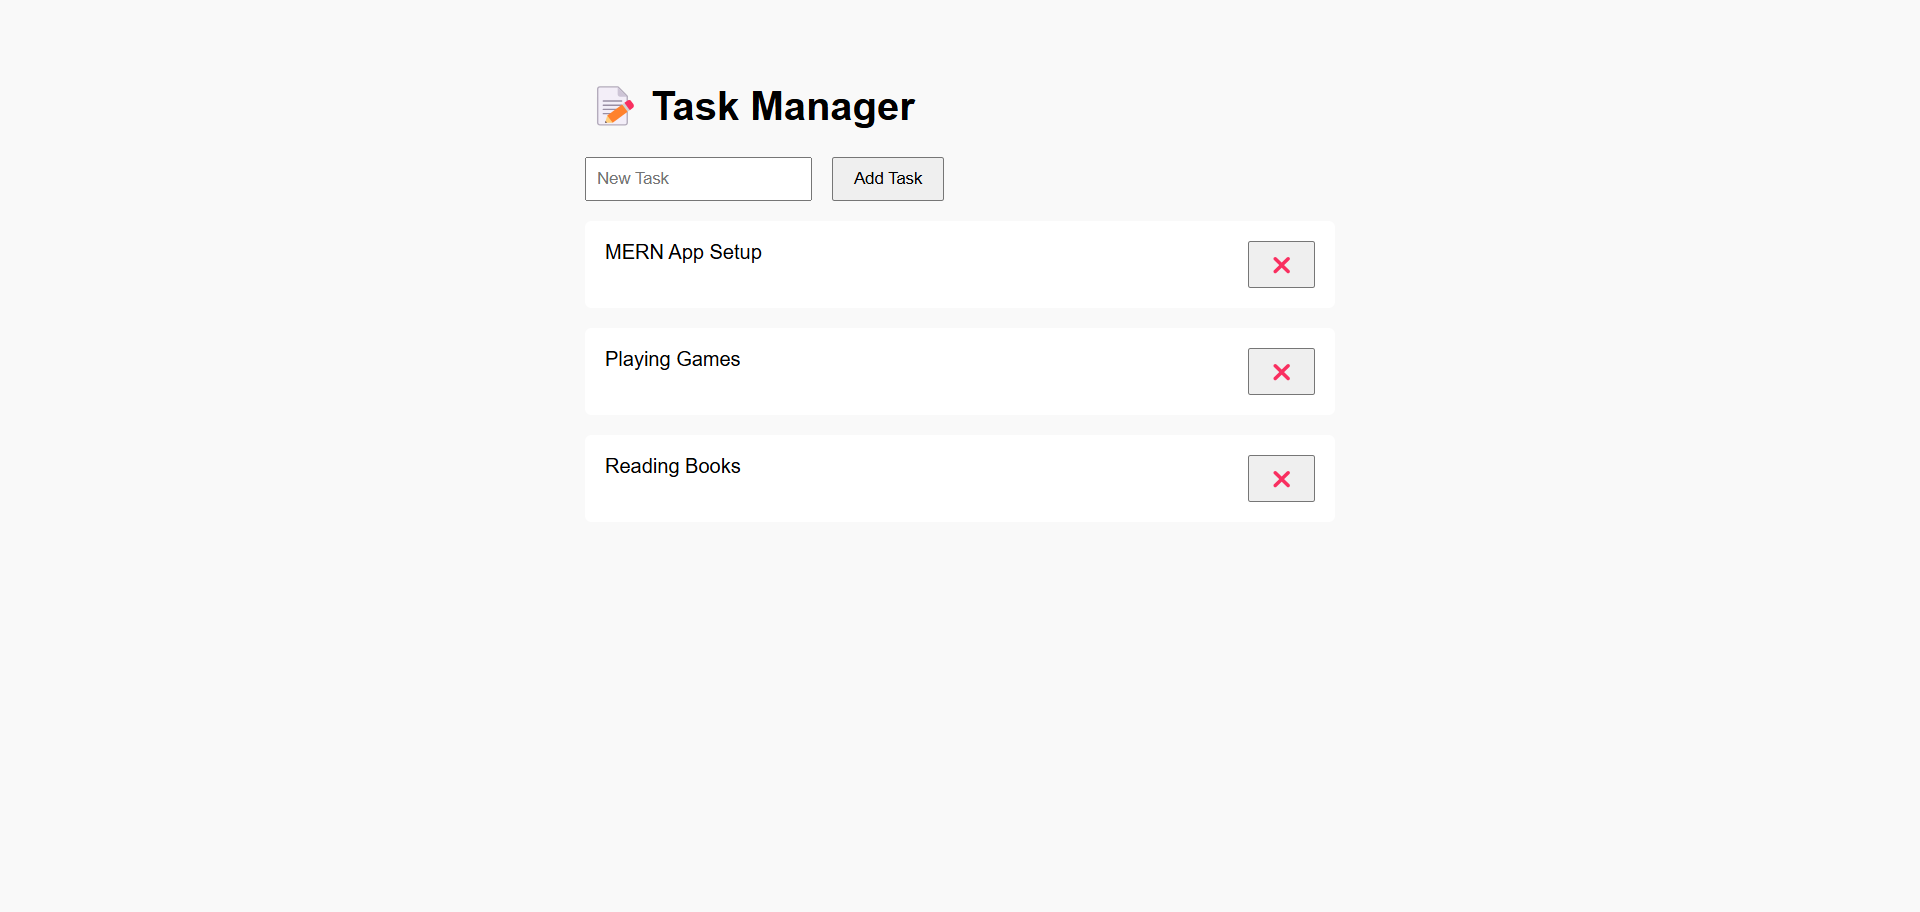
So, on the first terminal, it runs the backend of the application, and on the other terminal,l it runs the frontend of the application. That’s it. This is how we set up a MERN stack app. See below for a screenshot when running the frontend app using “http://localhost:5173/” URL on a browser.

References:
Conclusion:
Setting up a MERN stack app involves understanding each layer of the stack: the backend API with Express and MongoDB, and a dynamic frontend with React. With the help of this detailed guide, you’ve learned to structure your project using best practices, write clear and maintainable code, and build a seamless task manager app.
This tutorial is ideal for beginners who want to build a real-world MERN stack app and intermediate developers seeking to reinforce their skills using the latest standards in full-stack development.
